About Manuel Amunategui
Data scientist with over 20-years experience in the tech industry, MAs in Predictive Analytics and
International Administration, co-author of Monetizing Machine Learning and VP of Data Science at SpringML.
From consulting in machine learning, healthcare modeling, 6 years on Wall Street in the financial industry, and 4 years at Microsoft, I feel like I’ve seen it all. And this has opened my eyes to the huge gap in educational material on applied data science. Like I say:
It just ain’t real 'til it reaches your customer’s plate
I am a startup advisor and available for speaking engagements with companies and schools on topics around building and motivating data science teams, and all things applied machine learning.
Reach me at amunategui@gmail.com


|

Modeling 101 - Predicting Binary Outcomes with R, gbm, glmnet, and {caret}
Practical walkthroughs on machine learning, data exploration and finding insight.
Resources
Packages Used in this Walkthrough
- {caret} - modeling wrapper, functions, commands
- {pROC} - Area Under the Curve (AUC) functions
This is an introduction to modeling binary outcomes using the caret library. A binary outcome is a result that has two possible values - true or false, alive or dead, etc.
We’re going to use two models: gbm (Generalized Boosted Models) and glmnet (Generalized Linear Models). Approaching a new data set using different models is one way of getting a handle on your data. Gbm uses boosted trees while glmnet uses regression.
Let’s code!
We’re going to use the Titanic data set from the University of Colorado Denver:
titanicDF <- read.csv('http://math.ucdenver.edu/RTutorial/titanic.txt',sep='\t')
print(str(titanicDF))
## 'data.frame':	1313 obs. of  5 variables:
##  $ Name    : Factor w/ 1310 levels "Abbing, Mr Anthony",..: 22 25 26 27 24 31 45 46 50 54 ...
##  $ PClass  : Factor w/ 3 levels "1st","2nd","3rd": 1 1 1 1 1 1 1 1 1 1 ...
##  $ Age     : num  29 2 30 25 0.92 47 63 39 58 71 ...
##  $ Sex     : Factor w/ 2 levels "female","male": 1 1 2 1 2 2 1 2 1 2 ...
##  $ Survived: int  1 0 0 0 1 1 1 0 1 0 ...
## NULL
We need to clean up a few things as is customary with any data science project. The Name variable is mostly unique so we’re going to extract the title and throw the rest away.
titanicDF$Title <- ifelse(grepl('Mr ',titanicDF$Name),'Mr',ifelse(grepl('Mrs ',titanicDF$Name),'Mrs',ifelse(grepl('Miss',titanicDF$Name),'Miss','Nothing')))
The Age variable has missing data (i.e. NA’s) so we’re going to impute it with the mean value of all the available ages. There are many ways of imputing missing data - we could delete those rows, set the values to 0, etc. Either way, this will neutralize the missing fields with a common value, and allow the models that can’t handle them normally to function (gbm can handle NAs but glmnet cannot):
titanicDF$Age[is.na(titanicDF$Age)] <- median(titanicDF$Age, na.rm=T)
It is customary to have the outcome variable (also known as response variable) located in the last column of a data set:
titanicDF <- titanicDF[c('PClass', 'Age',    'Sex',   'Title', 'Survived')]
print(str(titanicDF))
## 'data.frame':	1313 obs. of  5 variables:
##  $ PClass  : Factor w/ 3 levels "1st","2nd","3rd": 1 1 1 1 1 1 1 1 1 1 ...
##  $ Age     : num  29 2 30 25 0.92 47 63 39 58 71 ...
##  $ Sex     : Factor w/ 2 levels "female","male": 1 1 2 1 2 2 1 2 1 2 ...
##  $ Title   : chr  "Miss" "Miss" "Mr" "Mrs" ...
##  $ Survived: int  1 0 0 0 1 1 1 0 1 0 ...
## NULL
Our data is starting to look good but we have to fix the factor variables as most models only accept numeric data. Again, gbm can deal with factor variables as it will dummify them internally, but glmnet won’t. In a nutshell, dummifying factors breaks all the unique values into separate columns (see my post on Brief Walkthrough Of The dummyVars function from {caret}). This is a caret function:
titanicDF$Title <- as.factor(titanicDF$Title)
titanicDummy <- dummyVars("~.",data=titanicDF, fullRank=F)
titanicDF <- as.data.frame(predict(titanicDummy,titanicDF))
print(names(titanicDF))
##  [1] "PClass.1st"    "PClass.2nd"    "PClass.3rd"    "Age"
##  [5] "Sex.female"    "Sex.male"      "Title.Miss"    "Title.Mr"
##  [9] "Title.Mrs"     "Title.Nothing" "Survived"
As you can see, each unique factor is now separated into it’s own column. Next, we need to understand the proportion of our outcome variable:
prop.table(table(titanicDF$Survived))
##
##      0      1
## 0.6573 0.3427
This tells us that 34.27% of our data contains survivors of the Titanic tragedy. This is an important step because if the proportion was smaller than 15%, it would be considered a rare event and would be more challenging to model.
I like generalizing my variables so that I can easily recycle the code for subsequent needs:
outcomeName <- 'Survived'
predictorsNames <- names(titanicDF)[names(titanicDF) != outcomeName]
Let’s model!
Even though we already know the models we’re going to use in this walkthrough, caret supports a huge number of models. Here is how to get the current list of supported models:
names(getModelInfo())
##   [1] "ada"                 "ANFIS"               "avNNet"
##   [4] "bag"                 "bagEarth"            "bagFDA"
##   [7] "bayesglm"            "bdk"                 "blackboost"
##  [10] "Boruta"              "brnn"                "bstLs"
##  [13] "bstSm"               "bstTree"             "C5.0"
##  [16] "C5.0Cost"            "C5.0Rules"           "C5.0Tree"
##  [19] "cforest"             "CSimca"              "ctree"
##  [22] "ctree2"              "cubist"              "DENFIS"
##  [25] "dnn"                 "earth"               "elm"
##  [28] "enet"                "evtree"              "extraTrees"
##  [31] "fda"                 "FH.GBML"             "FIR.DM"
##  [34] "foba"                "FRBCS.CHI"           "FRBCS.W"
##  [37] "FS.HGD"              "gam"                 "gamboost"
##  [40] "gamLoess"            "gamSpline"           "gaussprLinear"
##  [43] "gaussprPoly"         "gaussprRadial"       "gbm"
##  [46] "gcvEarth"            "GFS.FR.MOGAL"        "GFS.GCCL"
##  [49] "GFS.LT.RS"           "GFS.Thrift"          "glm"
##  [52] "glmboost"            "glmnet"              "glmStepAIC"
##  [55] "gpls"                "hda"                 "hdda"
##  [58] "HYFIS"               "icr"                 "J48"
##  [61] "JRip"                "kernelpls"           "kknn"
##  [64] "knn"                 "krlsPoly"            "krlsRadial"
##  [67] "lars"                "lars2"               "lasso"
##  [70] "lda"                 "lda2"                "leapBackward"
##  [73] "leapForward"         "leapSeq"             "Linda"
##  [76] "lm"                  "lmStepAIC"           "LMT"
##  [79] "logicBag"            "LogitBoost"          "logreg"
##  [82] "lssvmLinear"         "lssvmPoly"           "lssvmRadial"
##  [85] "lvq"                 "M5"                  "M5Rules"
##  [88] "mda"                 "Mlda"                "mlp"
##  [91] "mlpWeightDecay"      "multinom"            "nb"
##  [94] "neuralnet"           "nnet"                "nodeHarvest"
##  [97] "oblique.tree"        "OneR"                "ORFlog"
## [100] "ORFpls"              "ORFridge"            "ORFsvm"
## [103] "pam"                 "parRF"               "PART"
## [106] "partDSA"             "pcaNNet"             "pcr"
## [109] "pda"                 "pda2"                "penalized"
## [112] "PenalizedLDA"        "plr"                 "pls"
## [115] "plsRglm"             "ppr"                 "protoclass"
## [118] "qda"                 "QdaCov"              "qrf"
## [121] "qrnn"                "rbf"                 "rbfDDA"
## [124] "rda"                 "relaxo"              "rf"
## [127] "rFerns"              "RFlda"               "ridge"
## [130] "rknn"                "rknnBel"             "rlm"
## [133] "rocc"                "rpart"               "rpart2"
## [136] "rpartCost"           "RRF"                 "RRFglobal"
## [139] "rrlda"               "RSimca"              "rvmLinear"
## [142] "rvmPoly"             "rvmRadial"           "SBC"
## [145] "sda"                 "sddaLDA"             "sddaQDA"
## [148] "simpls"              "SLAVE"               "slda"
## [151] "smda"                "sparseLDA"           "spls"
## [154] "stepLDA"             "stepQDA"             "superpc"
## [157] "svmBoundrangeString" "svmExpoString"       "svmLinear"
## [160] "svmPoly"             "svmRadial"           "svmRadialCost"
## [163] "svmRadialWeights"    "svmSpectrumString"   "treebag"
## [166] "vbmpRadial"          "widekernelpls"       "WM"
## [169] "xyf"
Plenty to satisfy most needs!!
Gbm Modeling
It is important to know what type of modeling a particular model supports. This can be done using the caret function getModelInfo:
getModelInfo()$gbm$type
## [1] "Regression" "Classification"
This tells us that gbm supports both regression and classification. As this is a binary classification, we need to force gbm into using the classification mode. We do this by changing the outcome variable to a factor (we use a copy of the outcome as we’ll need the original one for our next model):
titanicDF$Survived2 <- ifelse(titanicDF$Survived==1,'yes','nope')
titanicDF$Survived2 <- as.factor(titanicDF$Survived2)
outcomeName <- 'Survived2'
As with most modeling projects, we need to split our data into two portions: a training and a testing portion. By doing this, we can use one portion to teach the model how to recognize survivors on the Titanic and the other portion to evaluate the model. Setting the seed is paramount for reproducibility as createDataPartition will shuffle the data randomly before splitting it. By using the same seed you will always get the same split in subsequent runs:
set.seed(1234)
splitIndex <- createDataPartition(titanicDF[,outcomeName], p = .75, list = FALSE, times = 1)
trainDF <- titanicDF[ splitIndex,]
testDF  <- titanicDF[-splitIndex,]
Hi there, this is Manuel Amunategui- if you're enjoying the content, find more at ViralML.com
Caret offers many tuning functions to help you get as much as possible out of your models; the trainControl function allows you to control the resampling of your data. This will split the training data set internally and do it’s own train/test runs to figure out the best settings for your model. In this case, we’re going to cross-validate the data 3 times, therefore training it 3 times on different portions of the data before settling on the best tuning parameters (for gbm it is trees, shrinkage, and interaction depth). You can also set these values yourself if you don’t trust the function.
objControl <- trainControl(method='cv', number=3, returnResamp='none', summaryFunction = twoClassSummary, classProbs = TRUE)
This is the heart of our modeling adventure, time to teach our model how to recognize Titanic survivors. Because this is a classification model, we’re requesting that our metrics use ROC instead of the default RMSE:
objModel <- train(trainDF[,predictorsNames], trainDF[,outcomeName],
                  method='gbm',
                  trControl=objControl,
                  metric = "ROC",
                  preProc = c("center", "scale"))
## Iter   TrainDeviance   ValidDeviance   StepSize   Improve
##      1        1.2314             nan     0.1000    0.0245
##      2        1.1948             nan     0.1000    0.0192
##      3        1.1594             nan     0.1000    0.0158
...
I truncated most of the lines from the training process but you get the idea. We then can call summary() function on our model to find out what variables were most important:
summary(objModel)

##                         var rel.inf
## Title.Mr           Title.Mr 26.2756
## PClass.3rd       PClass.3rd 20.8523
## Sex.male           Sex.male 20.7569
## Sex.female       Sex.female 11.4357
## Age                     Age 10.3042
## PClass.1st       PClass.1st  8.2905
## Title.Mrs         Title.Mrs  1.7515
## Title.Miss       Title.Miss  0.3332
## PClass.2nd       PClass.2nd  0.0000
## Title.Nothing Title.Nothing  0.0000
We can find out what tuning parameters were most important to the model (notice the last lines about trees, shrinkage and interaction depth:
print(objModel)
## Stochastic Gradient Boosting
##
## 986 samples
##  10 predictor
##   2 classes: 'nope', 'yes'
##
## Pre-processing: centered, scaled
## Resampling: Cross-Validated (3 fold)
...
## Tuning parameter 'shrinkage' was held constant at a value of 0.1
## ROC was used to select the optimal model using  the largest value.
## The final values used for the model were n.trees = 100,
##  interaction.depth = 1 and shrinkage = 0.1.
Evaluate gbm model
There are two types of evaluation we can do here, raw or prob. Raw gives you a class prediction, in our case yes and nope, while prob gives you the probability on how sure the model is about it’s choice. I always use prob, as I like to be in control of the threshold and also like to use AUC score which requires probabilities, not classes. There are situations where having class values can come in handy, such as with multinomial models where you’re predicting more than two values.
We now call the predict function and pass it our trained model and our testing data. Let’s start by looking at class predictions and using the caret postResample function to get an accuracy score:
predictions <- predict(object=objModel, testDF[,predictorsNames], type='raw')
head(predictions)
## [1] yes  nope yes  nope nope nope
## Levels: nope yes
print(postResample(pred=predictions, obs=as.factor(testDF[,outcomeName])))
## Accuracy    Kappa
##   0.8135   0.5644
The accuracy tells us that our model is correct 81.35% of the time - not bad…
Now let’s look at probabilities:
# probabilites
library(pROC)
predictions <- predict(object=objModel, testDF[,predictorsNames], type='prob')
head(predictions)
##      nope    yes
## 1 0.07292 0.9271
## 2 0.76058 0.2394
## 3 0.43309 0.5669
## 4 0.67279 0.3272
## 5 0.67279 0.3272
## 6 0.54616 0.4538
To get the AUC score, you need to pass the yes column to the roc function (each row adds up to 1 but we’re interested in the yes, the survivors):
auc <- roc(ifelse(testDF[,outcomeName]=="yes",1,0), predictions[[2]])
print(auc$auc)
## Area under the curve: 0.825
The AUC is telling us that our model has a 0.825 AUC score (remember that an AUC ranges between 0.5 and 1, where 0.5 is random and 1 is perfect).
Glmnet Modeling
Let’s change gears and try this out on a regression model. Let’s look at what modeling types glmnet supports and reset our outcome variable as we’re going to be using the numerical outcome instead of the factor.
getModelInfo()$glmnet$type
## [1] "Regression" "Classification"
outcomeName <- 'Survived'

set.seed(1234)
splitIndex <- createDataPartition(titanicDF[,outcomeName], p = .75, list = FALSE, times = 1)
trainDF <- titanicDF[ splitIndex,]
testDF  <- titanicDF[-splitIndex,]
We re-run some of the basic training and prediction functions with some slight changes:
objControl <- trainControl(method='cv', number=3, returnResamp='none')
objModel <- train(trainDF[,predictorsNames], trainDF[,outcomeName], method='glmnet',  metric = "RMSE", trControl=objControl)
predictions <- predict(object=objModel, testDF[,predictorsNames])
auc <- roc(testDF[,outcomeName], predictions)
print(auc$auc)
## Area under the curve: 0.857
This is a stronger AUC score than our previous gbm model. Testing with different types of models does pay off (take it with a grain of salt as we didn’t tune our models much).
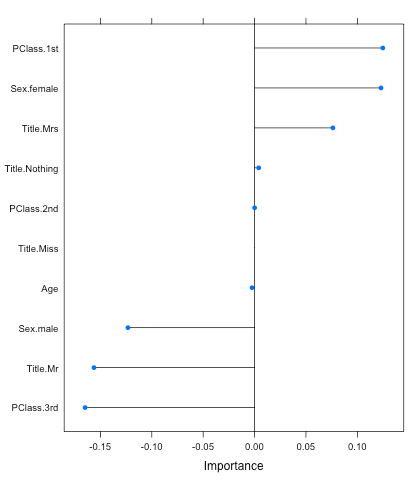
You can also call the caret function varImp to figure out the variables that were important to the model. And this is one great feature of the glmnet model; it returns positive and negative variable importance unlike most models. This helps deepens your understanding about your variables, such that being in PClass.1st leans the probabilities in the survivor’s favor while PClass.3rd does the opposite (make sure you set scale to False):
plot(varImp(objModel,scale=F))